Updated Wed 7 Nov 2018 • tags uniview, apps
UniView is a Web-based application for working with Unicode characters. No need to install anything – just open in a browser. You can look up or find characters (using graphics or fonts) and related information, view whole character blocks or custom ranges, select characters to paste into your document, paste in and discover unknown characters, search for characters using regular expressions, do hex/dec/ncr conversions, highlight character types, etc. etc. It supports Unicode 16.0 (beta) and is written with Web Standards to work on a variety of browsers.
You can find the source code on github, and a list of recent changes. See also the change log for a summary of changes in each release. If you spot a bug, please raise a github issue.
Click on the area you need help with:
To get started, either:
 button to list the characters.
UniView produces tables or lists of characters in the Character list panel (lower left).
Clicking/tapping on characters in a table or list displays detailed information for them in the right-hand part of the page. Double-clicking/tapping adds the character to the text area. To move all characters to the text area, click on  .
.
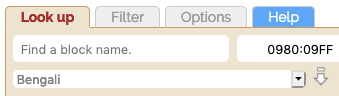
The control with the placeholder text Find a block name helps you find a block when you don't know how the name starts, or find a list of blocks with names that share the same text.
For example, to find a Pahlavi block, start typing 'pah'. You'll see the following:
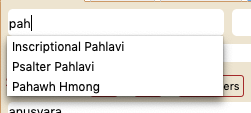
Click on one of the block names. The name will appear in the field where you typed 'pah'. Chrome and Safari will immediately show the Unicode block you chose, but for Firefox you will need to hit return to show the block.
Just below that is a pulldown control with placeholder text Select a block that lists all Unicode blocks, grouped by type or region.
Click on the ![]() icon to refresh the results.
icon to refresh the results.
Notes:
If you type or paste a start and end code point value (in hex) into this control, the characters in the range will display below. Note that this can only be one contiguous range.
Click on the ![]() icon to refresh the results.
icon to refresh the results.
If the range you select does not fill a whole column when displayed as a table, surrounding characters are greyed out. (When displaying as a list, you will only see the characters in the range.)
The range field will accept various formats, making it easier to paste a range from elsewhere. The numbers must be in hexadecimal form (between 1 and 6 digits) but can be separated by any of the following:
The code point values themselves can be in plain hex, HTML, CSS, JavaScript, or U+ formats, eg. 1234, ሴ, \1234;, \u1234, U+1234.
Notes:

This set of controls allows you to search for text in the Unicode database, and returns a list of matching characters.
You can use regular expressions in searches. For example, suppose you wanted to find all characters with the word 'tet'. You could type into the input field, \btet\b. The \b represents a word boundary. If you wanted to search for entries containing either the word 'tet' or the word 'tat' you can use the 'or' operator | as in \btet\b|\btat\b.
Another example: You want to search for 'alpha', but you only want results for the Latin characters (not the many Greek or
mathematical results). Simply use the following search string latin.*alpha. The .* represents any number of intervening
characters.
Any basic regular expression that works in JavaScript code should work.
By default, searches match against character names and alternative names in the main Unicode database, and also search the information displayed for an individual character under the heading Description in the right panel. You can limit the search using the Names, Descriptions and Other check boxes that appear below the input box. Other refers to alternative names.
You can also limit the search to the characters currently in a list or table. To do this, select the check box labelled Local. Matching characters will be highlighted. (You can then produce a list of just the highlighted characters by clicking on the icon next to Filter > Make list from highlights. If you need to refine your search, you could then search again on this list, and so on.)

Type one or more hex codepoint values, decimal codepoint values, or characters into the appropriate input field and click on  .
.
This field is very forgiving about the format of the text entered into the box. Most types of character escape will be recognised, and you can even paste in surrounding text. For example, UniView will detect and list the characters referred to by code point in the text "the decomposition mapping is <U+CE20, U+11B8>, and not <U+110E, U+1173, U+11B8>." Of course, this is not foolproof, but should provide the desired results most of the time.
Separate multiple hex and dec values with a space.
If the Characters button is selected, each character in the control will be processed. (Much of the time you will probably find it easier to use the text area for this, but this control can be used if you want to look up some characters without disturbing a set of characters you are building up or using in the text area.)
If the check box is selected, characters (apart from those in the text area and notes area) will be shown as images, rather than text.
Dedicated images are available for all characters except for those in the large Han, Hangul and Tangut blocks. I recommend installing the free Babelstone Han and Tangut Yinchuan fonts to get good coverage.
You can set a font for the displayed characters using the Options > Change Font control. If you want to find MacOS, Windows, Noto, or SIL fonts, check out the Font lister page. When you select a Unicode block, a pointer to the relevant page appears at the top right of the panel.

If this check box is selected when you want to display a Unicode block or range, the characters will be displayed as a list, rather than a table.
You can also use this to switch between table and list views of a range you have just selected.
If this control is selected and you display information about a character in the Character details panel (lower right), any available notes will be displayed at the bottom of the page.
The notes are created while writing Orthography Notes. Those pages are continually revised, in which case the notes may also change from time to time.
The Used by links point to orthographies known to the Character Use app that use this character.

This control allows you to change the size of the characters in the lower left panel (independently of text elsewhere on the page). Note: It has no effect when viewing characters as graphics.
To see all text larger, use the normal browser method for zooming (eg. Ctrl++ and Ctrl+-).
If you want to find MacOS, Windows, Noto, or SIL fonts, check out the Font lister page.

The block info link appears when you select a block for display. Click on it to open a page of useful links related to that block. (The page opens in another window.)
The Text area is associated with a set of controls for managing characters as text. It makes UniView like a character map or picker tool, but also much more. You can add characters to the text area from other parts of UniView, or you can simply paste text into it for analysis.
The insertion point for characters echoed to the text area can be changed in most browsers by just clicking where you want characters to appear. If you highlight a range of text, any typed or echoed characters will replace the highlighted range.
Text area controls. You can interact with the text in the text area using the icons below it. They are described here:
Creates a list in the Character list panel of the characters in the Text area. This is particularly useful for investigating text with characters you can't see or correctly identify. Simply paste the text into the text area and click on this icon, and UniView will produce a list of the names and code points for all the characters in the text area.
Copies to the Text area all the characters currently displayed in a list or table in the Character list panel. This is particularly useful for capturing search results, or making a list of all characters in a block, etc.
If you have filtered out characters in the Character list panel, only the unfiltered characters will be added to the text area.
 Highlights all the text in the box. (Particularly useful to check you have caught all combining characters when copy-pasting to another location.)
![]() Clears all text from the text area.
Clears all text from the text area.
 Adds spaces between each of the characters in the text area. This is useful for generating space-separated lists of characters, or sometimes just for making it easier to see what characters are in the text area.
 Removes whitespace from between each of the characters in the text area. (This can be useful for counting characters, see below).
 Adds commas between each of the characters in the text area. This is useful for generating comma-separated lists of characters to be copy-pasted elsewhere.
Note: If you are using UniView on an iPad in portrait mode, this control is not available.
 Any hyphen-separated lists in the text area are expanded. For example, if you have A-Z in the text box, it will be replaced with ABCDEFGHIJKLMNOPQRSTUVWXYZ. You can expand multiple ranges at the same time. For example, A-Za-z0-9 will expand to include all intervening characters for the three ranges specified.
 Allows you to convert a list of items on a single line to a vertical list. Add spaces where you want line-breaks to appear, then click on this icon.
Note: If you are using UniView on an iPad in portrait mode, this control is not available.
 Counts the number of codepoints in the text area.
 Displays the characters taken from the text area with all relevant characters converted to uppercase, lowercase and titlecase.
Characters that have no case conversion transforms are also listed, separately. Duplicates are removed from this list.
This is based on data taken from the Unicode database, so it should work for all characters supported by this version of UniView, including new blocks in beta, and doesn't depend on the algorithms being updated for JavaScript or other applications.
Font changes should apply to these lists.
 Look up the Han characters in the text area in the UniHan database. (Opens a page in a separate window.)
If you have more than one code point or character in the box, UniView will open a separate window containing Unihan information for each. If you try to open more than 5 windows, a warning will pop up.
You can also find a link to the Unihan database in the character details panel when a CJK Unified Ideograph is displayed there.
 or
or  Converts the text in the text area to Unicode Normalization Form C or D (NFC or NFD). The change may not be immediately obvious, but if you click on you should see any changes to the text.
 Converts all the characters in the text area to space-separated hexadecimal values.
 Does the inverse: it converts a set of space-separated hex codes to characters. In fact, it can also accept a range of escapes as input, and they don't need to be space-separated.
 Opens other apps or pages based on the character(s) or script found in the text area. (Some options will only work with the first of multiple characters – such as those options that look up the script.)
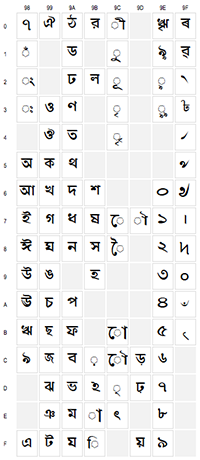
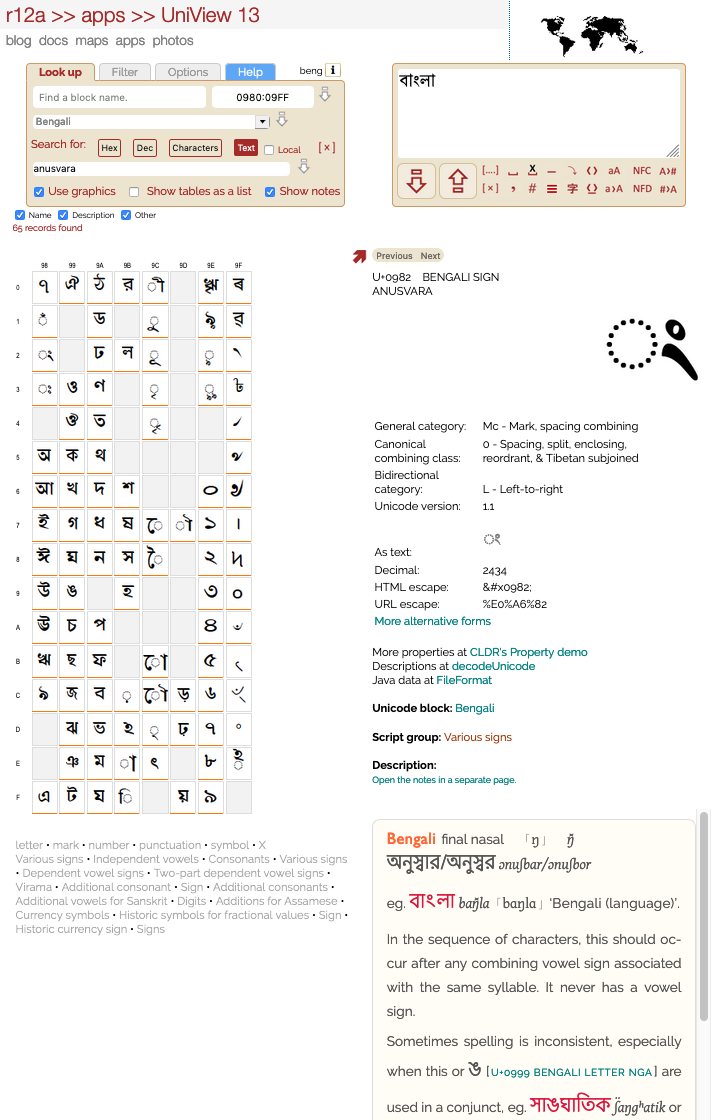
The character list panel is where you will see tables and lists of characters that you generate from elsewhere in UniView.
When characters are displayed in table format and you hover over a character in this area you will see the code point and name appear at the top of the panel.
Whether in table or list format, if you click on a character one of two things will happen. Either details for that character will appear to the right, or the character will be added to the text area. The former is the default, but the latter will happen if you click on the icon described just below.
Unassigned character positions in a table are shown with a greyed out background (though you can change the colour, if you want).


Click on the above icons to determine what happens when you click on a character in a table.
If the first is showing, the character will be added to the text area. (You can also add characters to the text area, regardless of the settings of these icons, by double-clicking on them.)
If the second is showing, character data will be displayed in the character detail panel, to the right.
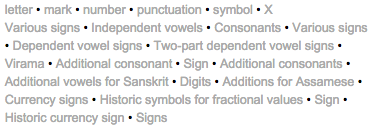
For each block or range of characters, these links allow you to quickly highlight characters with the property letter, mark, number, punctuation, or symbol. For more fine-grained property distinctions, see the Filter panel.
In addition, there are links for each of the subdivisions in the Unicode charts. Note that the subdivisions are listed in the order they appear in the charts, so in some cases there are more than one link with the same name. This is the case in Bengali, as you can see above, for the subdivisions called 'Various signs'.
(Since the highlight function is used for this, don't forget that, if you happen to highlight a useful subset of characters and want to work with just those, you can use the Make list from highlights command, or click on the  icon to move those characters into the text area.)
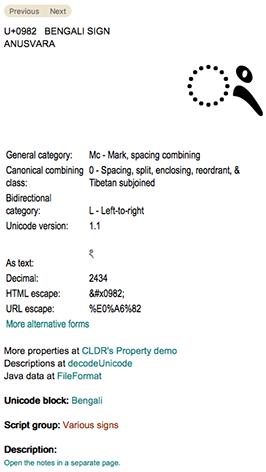
This panel shows detailed information and links for a single character.
The previous and next clickable text at the top allows you to step through characters in the block one by one. It skips code values that don't have assignments, and at the end of a block it will move you to the first character of the following block, and vice versa.
For Han and Hangul characters you will see a link View in PDF code charts (pageXX). For Han blocks, this will open the PDF file for the block. The PDF is useful if there is no picture or font glyph for that character, but also allows you to see the variant forms of the character. Get more information.
There are two pull-down controls for characters that belong to a block related to a writing system, but only one for other blocks. These provide links that allow you to explore this character or the relevant script in other apps and pages.
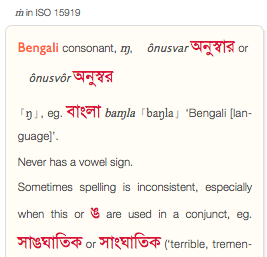
The notes panel appears only when a check mark appears alongside Show notes in the Lookup panel. It also only appears if notes actually exist for character being displayed in the Character details panel.
The notes are created during work on the various Orthography Notes pages. Notes may change and new notes will be added from time to time.
If a note is displayed, you'll also find a link at the bottom of the Character details panel that allows you to open the full page from which the notes were taken. These pages carry annotations for a whole Unicode block or set of blocks.
Click on the area you need help with:
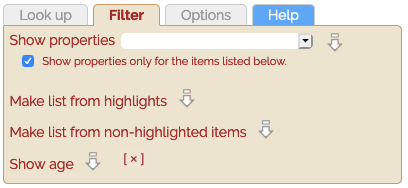

This control allows you to search for characters with a particular property. It creates a list of matching characters.
By default, searches match against the characters in a list or table in the Character list panel. Matching characters will be highlighted. (You can then produce a list of just the highlighted characters by clicking on the icon next to Filter > Make list from highlights. If you need to refine your search, you could then search again on this list, and so on.)
To enlarge the search to the whole of Unicode, deselect the check box labelled Show properties only for the items listed below.

If you have highlighted items in a list, using the Find or Show properties controls, this control will remove all but the highlighted items from the list.

If you have highlighted items in a list in the lower left panel, using the Find or Show properties controls, this control will remove all the highlighted items from the list, leaving the non-highlighted items only.

This control allows you to see when a character was added to Unicode. It shows version numbers for characters added after Unicode version 1.1.
You can also find the same information on a character-by-character basis in the Character detail panel for that character.
To remove the information, click on the X icon alongside, or display new data in the left panel.
Click on the area you need help with:

This allows you to change the order and items in lists appearing in the lower left panel. By default, you would see something like this:
With this control you can position the character before or after the number (or both!) or remove it altogether. You can also specify whether the list should show the number and/or the name of the character.
This control is provided for people who want some control over how the list will look when copied and pasted into their text.

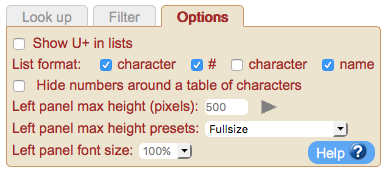
If this is checked, hex code point numbers in lists will be preceded by U+. The default is just the number.

This allows you to hide the column and row numbers around a table. The default is to show the numbers.

Allows you to apply a font to characters in the tables and lists. It also affects the large character at the top of the right-hand panel, and the As text output.
Add the font name to the input field and click on the icon to the right to apply it. (Of course, this only works if Use Graphics is deselected.)
To find MacOS, Windows, Noto, or SIL fonts, check out the Font lister page.
The way to make a single character in a matrix or list appear in the text area is to double-click on it.
To copy all characters in the list or table into the text area, click on the icon, which can be found just below the text area.
On the Filter tab, click on Make list from highlights. The characters shown in the lower left panel will be reduced to a list of just those that were highlighted. (This is particularly useful for refining searches.)
On the Filter tab, click on Make list from non-highlighted items. The characters shown in the lower left panel will be reduced to a list of just those that were not highlighted. (This is particularly useful for refining searches.)
Mouse over a character and the decimal code point value pops up in a tooltip. The decimal code point value is also shown in the right panel.
If mouseover doesn't work (for example on a mobile phone), display the details for the character and you will see the decimal code point listed.
This can be particularly useful when you want to copy and paste a list into another document. In the options, use the check boxes after List format to indicate what you want to see.
Toggle the check box labelled Show U+ in lists on the Options tab.
Information about Han characters will have a link View data in Unihan database. As expected, this opens a new window at the page of the Unihan database corresponding to this character.
Han and hangul characters also have a link View in PDF code charts (pageXX). For Han blocks, this will open the PDF file for that block at the page that lists this character on Firefox and Chrome. (For Safari and Edge you will need to scroll to the page indicated.) The PDF is useful if there is no picture or font glyph for that character, but also allows you to see the variant forms of the character.
For some Han blocks, the number of characters per page in the PDF file varies slightly. In this case you will see the text approx; you may have to look at a page adjacent to the one you are taken to for these characters.
Note that some of the PDF files are quite large. If the file size exceeds 3Mb, a warning is included.
The following options are available from the Character details panel.
Click on the Show more character properties link. A new window will open to show the entry for that character in the CLDR's property demo. This provides additional, less commonly used data and properties relating to the character.
Select a destination from the Explore this character in control. A new window will open to show this character in another app.
Select a destination from the Explore the ... script control. A new window will open to show information related to the script to which the character belongs.
Click on the link next to the subheading Show block in the Character details panel and all characters in that block will be displayed as a list or table (according to your settings).
This is useful for pointing people to particular information using a URL, for example in email. By providing query parameters in the URI you can start up UniView with specific information displayed as follows:
You should only use one of these query parameters in a single call to UniView.
François Yergeau co-developed the original Unicode Code Converter utility, and translated it into French. That code is no longer used for UniView.
Patrick Andries translated UniView into French, but that was many versions ago, and the French version is no longer available.